


Artwork & Design:
At P3 Printing, we believe that outstanding print starts with outstanding artwork. This page is your comprehensive guide to preparing your files for a flawless print, or to connect you with our talented design team who can bring your ideas to life.
Option 1: Supplying Your Own Print-Ready Artwork
If you’ve got your designs ready to go, fantastic! For your final printed product to look exactly as you envision it, it’s essential that your files are “Print-Ready.”
What Does “Print-Ready File” Mean?
A print-ready file is a digital artwork file that has been correctly prepared with all the necessary technical specifications for high-quality printing. It means the file can be sent directly to our printers without requiring any modifications, ensuring accurate colours, sharp details, and correct sizing. Getting it right now saves time and ensures a perfect print!
Our Preferred File Format:
- PDF (Portable Document Format): This is our top recommendation for print-ready files! PDFs lock your design elements, preserving fonts, images, and layouts precisely as you created them. When saving from design software, choose “PDF/X-1a:2001” or “Press Quality” presets if available.
Other Accepted File Formats:
- Adobe Illustrator (.AI): Ideal for vector graphics (logos, text). Ensure all fonts are outlined (converted to curves) to avoid font substitution issues.
- Adobe Photoshop (.PSD): Best for raster-based images (photos, complex artwork). Flattened files are preferred; if layers are retained, please include all linked files and fonts.
- Encapsulated PostScript (.EPS): Similar to AI, outline all fonts.
- High-Resolution JPEG (.JPG) / PNG (.PNG): Suitable for simple images, but please ensure they meet resolution requirements and, if intending a solid background, that they don’t have transparency (for PNGs).
Your Essential Print-Ready Artwork Checklist:
- Resolution is King (300 DPI): All images and raster elements in your design must be at least 300 dots per inch (DPI) at their final printed size. Why 300 DPI? Because anything lower will result in pixelated, blurry, or “blocky” prints. Standard screen resolution (72 DPI) is not sufficient for print.
- CMYK Colour Mode: Your artwork must be set up in CMYK (Cyan, Magenta, Yellow, Black) colour mode. Our professional printers use these four ink colours to produce your design. If your file is in RGB (Red, Green, Blue, used for screens like monitors and phones), the colours will be automatically converted, which can lead to noticeable and often undesirable colour shifts in the final print.
- Bleed (3mm Essential): If any background colours, images, or design elements extend to the edge of your finished product, they must extend 3mm beyond the final trim line on all sides. This “bleed” acts as a safety margin, preventing thin white edges from appearing if there’s a slight shift during the cutting process.
- Safe Zone (3mm Inwards): Keep all critical text, logos, and important graphics at least 3mm inside the final trim line. This “safe zone” ensures that no vital information gets accidentally cut off during the trimming process.
- Outline Your Fonts: For vector files (.AI, .EPS, sometimes PDF), convert all text to outlines (also known as curves or paths). This embeds the font shape into the design, ensuring your chosen fonts display correctly on our systems, even if we don’t have them installed. This step prevents font substitution and unexpected layout changes.
Specific to Stickers: Cut Lines are Crucial
If you are ordering stickers or decals that require a specific shape, you must include a dedicated cut line in your artwork.
- Cut Line Must Be a Vector Path: The cut line must be a vector path (created in programs like CorelDraw, Adobe Illustrator or similar). This path tells our cutting machines exactly where to cut your sticker.
- No JPEGs for Cut Lines: A cut line cannot be a JPEG or any other raster image. Raster images are made of pixels, and our cutting machines need precise vector paths to follow.
- Separate Layer or Spot Colour: Ideally, the cut line should be on a separate layer in your design file and/or use a distinct spot colour (a specific, named colour that stands out). This makes it easy for us to identify and isolate the cut path.
- Clear and Closed Path: The cut line must be a continuous, closed path (meaning it connects back to its starting point). Open or broken paths will result in incomplete cuts.
Don’t Forget Your Proof! Even with print-ready files, we will always provide you with a digital proof for your final approval. Please review it meticulously – check for typos, correct colours, image resolution, and overall layout, and especially the accuracy of the cut line. Production will only begin once we receive your explicit go-ahead.
Option 2: Working with Canva Files
Canva is a fantastic tool for quick and easy design, and many of our clients use it. However, it’s important to understand its nuances when preparing files for professional printing to avoid common pitfalls.
Saving Your Canva Files for Print:
- Choose “PDF Print”: When downloading your design from Canva, always select the “PDF Print” option (under “Share” -> “Download” -> “File type”). This is the best option for print-ready quality.
- Tick “Crop Marks and Bleed”: In the PDF Print download options, ensure you check the box for “Crop marks and bleed.” This adds the crucial bleed area that print shops require.
- Flatten PDF: While Canva’s PDF Print generally flattens the file, if you have complex elements or transparency, sometimes issues can arise. Our team can help ensure your Canva PDF is fully flattened if needed.
Understanding SVG from Canva (and when to use it):
SVG (Scalable Vector Graphics) files are excellent for vector-based artwork like logos, icons, and sharp illustrations because they can be scaled to any size without losing quality or becoming pixelated.
- Canva’s SVG Export: Canva’s SVG export works best for simple, vector-like elements that you’ve created directly within Canva using their shapes, lines, and text tools.
- Limitations: If your Canva design includes raster images (photos, complex backgrounds you’ve uploaded), saving the entire design as an SVG from Canva will NOT magically turn those raster elements into vectors. They will remain raster within the SVG, and trying to scale them beyond their original resolution could lead to pixelation.
- When to use SVG from Canva: Ideal for extracting a simple logo or a single icon you designed in Canva to be used elsewhere at varying sizes.
- When to stick to PDF Print: For full print layouts involving photos, gradients, or complex designs, “PDF Print” remains the superior choice for overall quality and accuracy.
Need Help with Your Canva Files? If you’re unsure whether your Canva file is truly print-ready, especially with cut lines, or if you need specific elements converted to true vectors for other uses, don’t worry! Our design team is here to assist. We can review your Canva files and make the necessary adjustments to ensure they print beautifully.
Option 3: Need Design Help? We’ve Got You Covered!
Don’t have print-ready artwork? No problem at all! Our creative team at P3 Printing loves bringing ideas to life. We specialize in effective, eye-catching design that’s specifically tailored for print.
Our Design Services Include:
- Minor Adjustments & Tweaks: Have almost-ready artwork but need a few changes, font outlining, or bleed added? We can fine-tune your files to make them print-perfect. Included in our 30 min free layout.
- Recreation from Scratch: Got a low-res logo, a hand-drawn sketch, or an old business card you need to bring back to life? We can recreate your designs into high-quality, print-ready files.
- Full Custom Design: From concept to completion, our designers can create stunning visuals for your brochures, flyers, banners, business cards, and more. Tell us your vision, and we’ll craft a design that resonates with your brand.
- Branding & Consistency: We can help ensure your printed materials align perfectly with your existing brand identity, maintaining consistency across all your marketing collateral.
How Our Design Process Works:
- Consultation: Share your ideas, goals, and any existing brand assets with us.
- Quoting: We’ll provide a transparent quote for the design service based on complexity and estimated time.
- Concept & Drafts: Our designers will get to work, providing initial concepts or drafts for your review.
- Revisions: We’ll work with you through a set number of revisions until you’re absolutely thrilled with the design.
- Final Approval: Once approved, we’ll prepare the print-ready files and proceed with your order!
Let Our Creativity Solve Your Design Needs! We take immense pride in our problem-solving abilities and creative solutions. No matter how unique or challenging your printing project, if you’re looking for something special or need expert guidance, please don’t hesitate to reach out! We are passionate about helping our clients achieve outstanding results.
Ready to start your print journey?
- Got artwork? Browse our products and upload your files directly!
- Need design help? Contact us at hello@p3printing.co.za or 083 790 7566 to discuss your project.
Custom Stickers

We offer 30 min free set up and layout to prepare your files for printing, but there are elements of your design that need to be adhered to.
Preparing Your Artwork for Spot Gloss & White Ink: Essential Steps
To achieve truly stunning results with our unique Spot Gloss and White Ink effects, precise artwork preparation is crucial. Please follow these specialized guidelines in addition to our standard design instructions.
Free Setup & Artwork Preparation: How We Help
We offer up to 30 minutes of complimentary setup and layout services to help prepare your files for printing. Our team will assist in getting your artwork print-ready, but to ensure the best results, there are key design elements that need to be adhered to on your end.
1. The Foundation: Separate Vector Layers
- For both Spot Gloss and White Ink, you must create a separate, dedicated spot colour layer within your design file. These layers are critical for telling our machines exactly where to apply the special effect.
- All elements on these special effect layers must be vectors. Raster files (like JPEGs, PNGs, or Bitmaps) will not work directly for these effects.
2. Converting Raster to Vector (If Needed)
- If your design includes images or shapes that are currently JPEGs, PNGs, or Bitmaps, you will need to convert them to vectors. Most design software offers a "trace" or "image trace" function to do this.
- Important for Text: The trace function does not work reliably for text. Any text you wish to have a special effect applied to must be created as vector text within your design software.
3. Assigning Unique Spot Colours
- Choose a specific spot colour that is not present anywhere else in your main design to represent your special effect layer(s).
- If you are using BOTH White Ink & Spot Gloss: Select two distinct spot colours, neither of which is in your design. Clearly indicate which colour is for "Spot Gloss" and which is for "White Ink" (e.g., in your file name or an accompanying note).
4. Optimizing Your Special Effect Layer
- Best Practice: Aim to have a single vector object for each special effect layer. This means "welding" or combining all individual vector paths that make up your effect into one unified shape. This ensures seamless application and simplifies the printing process.
- Crucial for Layer Visibility: When working with these special effect layers, please remember that if a special effect object is present on its dedicated layer, it will be printed. Simply "hiding" an element (e.g., by placing a white shape over it in your main design) will not prevent the special effect from being applied beneath it. Our print software sees the special effect layer regardless.
- Example: If you want a circle with a smaller, un-glossed/un-whited circle in its centre, you must create the outer object by trimming or removing the inner circle from it. This leaves a "hole" in the special effect layer, ensuring the inner area receives no effect.
5. File Submission: Structured Pages for Clarity
- For best results and to ensure accuracy, please send us your design as 2 or 3 separate pages (or artboards) within a single design file PDF):
- Page 1: Your Main Design with Kiss Cut Line. This page should contain your complete, full-colour artwork, including the vector line for the cutting path.
- Page 2: Special Effect Layer(s). This page should be a direct copy of your design from Page 1. Crucially, remove all elements that do not require a special effect. The remaining elements (which do receive the effect) should be filled with your chosen unique spot colour(s) for White Ink and/or Spot Gloss.
- (If using both White Ink and Spot Gloss, you might choose a Page 2 for White Ink and a Page 3 for Spot Gloss, each with its designated spot colour.)
6. Canva User Specifics
- If you are designing in Canva, please save your final artwork as an SVG file to ensure your design elements are exported as vectors, which is essential for applying special effects.
Visual Guide:
- Please refer to our diagram on this page for a clear visual explanation of how to structure your multi-page design file for special effects.
Pull Up Banners
Pull Up Banners
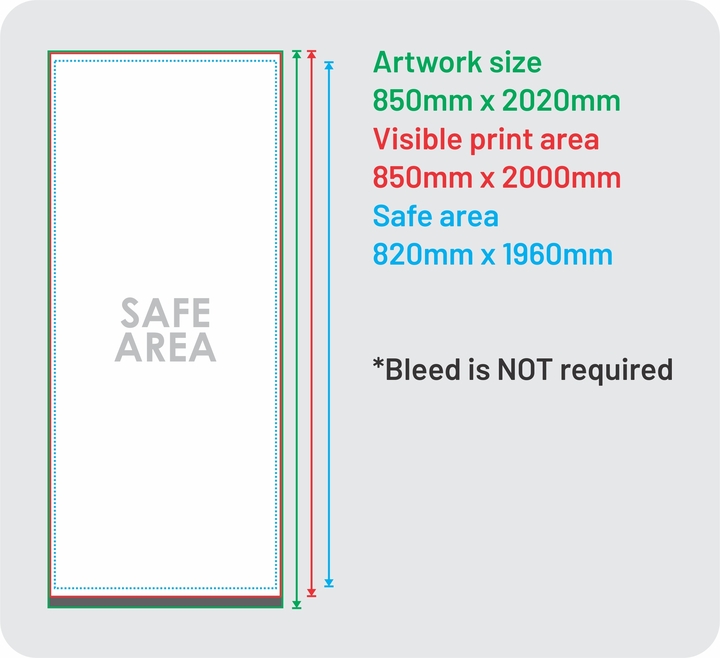
- The finished visible size of Pull Up Banners is 850 x 2000mm
- Bleed is not required
- Artwork must be supplied to size, 850mm x 2020mm
- The safe area for design elements is 820 x 1960mm
- Background should be the full artwork size, and critical design elements should be kept within the safe area.
- Safe area = 20mm from the top, 40mm from the bottom and 15mm on either side
- Resolution: All raster images (photos, etc.) must be at a minimum resolution of 150 DPI at 100% scale for large format printing. 300 DPI is preferred for optimal quality.
- Preferred colour mode: CMYK
- Fonts must be completely imbedded or converted to curves
- Flatten layers to reduce file complexity
- Flatten all transparency effects (e.g., drop shadows, glows, gradients) to avoid rendering issues in CorelDRAW.
- Rasterize effects where necessary.
- All design files must adhere to the specifications outlined in our comprehensive design brief, which can be accessed here